 +1 (774)478-6704
 Order@premiumonebackdrops.com


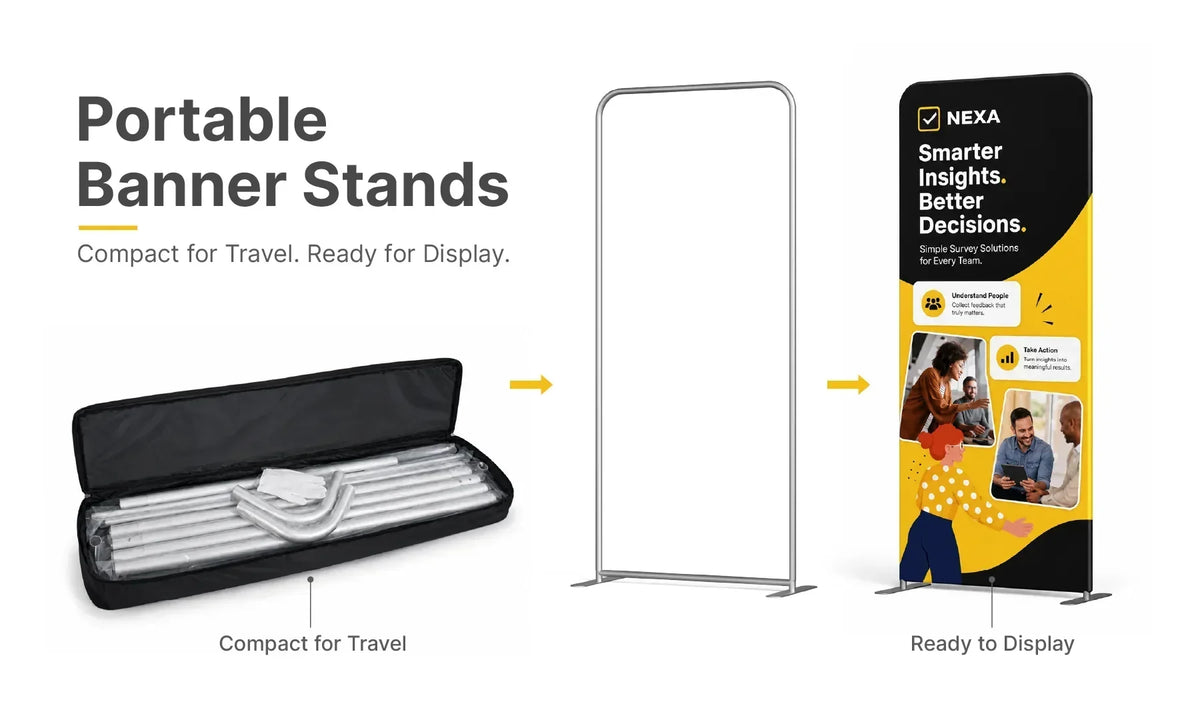
When your business moves between weekend markets, trade shows, brand events, and creator meetups, your display needs to move with you. A large booth can look impressive, but it may be difficult to store, transport, assemble, and repack when you work alone or change venues often.
A portable banner stand creates a clear branded area without filling your vehicle or booth with unnecessary equipment. The right choice should work through the complete event cycle: Pack, Travel, Set Up, and Display. This guide explains what to check at each stage and compares two POB fabric options for vendors and creators.
Why Portability Is More Than Low Weight
A lightweight frame helps, but weight alone does not make a display practical. A useful portable banner stand balances four factors:
- Packed size: Will the frame, graphic, feet, and connectors fit in your vehicle or shipping case?
- Total weight: Can the person responsible for the display move the complete package safely?
- Setup method: How many parts must be connected, and can your normal event team manage them?
- Finished display area: Is the graphic large enough to communicate the message in the planned space?
Start with the audience and the action you want them to take. The U.S. Small Business Administration's marketing guidance recommends defining the target market, goals, sales plan, channels, and budget. Those decisions should guide the size and message of your event display.
Pack: Choose a Display That Stores Well
A portable display often spends more time packed than assembled. Before ordering, confirm whether the package includes the frame, graphic, feet or base, connectors, and carrying bag. Review the packed dimensions and full weight for the exact size and printing option. A larger frame or double-sided graphic can change both.
Pack fabric clean and dry, and keep sharp frame parts away from the printed surface. Use broad, loose folds without pressing a hard crease through the logo, headline, or main photograph. When storage space allows, a loose roll may help reduce fold lines.
Travel: Plan the Entire Journey
Travel may mean carrying the display to a car, shipping it to a convention center, or flying with it. Plan every step from storage to the final booth:
- Measure the packed display, not only the visible graphic.
- Weigh the complete bag with the frame, feet, graphic, and accessories inside.
- Decide whether a soft carry bag gives enough protection for the journey.
- Keep small connectors in a labeled pouch and label the outer bag.
- Check how the package will move from the loading area to the event space.
Do not assume that a portable banner stand qualifies as standard airline luggage. The Federal Aviation Administration advises travelers to check baggage requirements with the airline. Size limits, weight limits, fees, and handling rules can differ by carrier, route, aircraft, and fare type.
A soft bag keeps parts together and protects against dust or light scratches. For frequent shipping, a suitable protective outer case may offer better impact protection.
Set Up: Match the System to Your Team
Setup can feel different when you are also unloading products, arranging a table, and checking in with the organizer. Practice the full process once before the event:
- Unpack: Lay out the frame, feet, connectors, and graphic in installation order.
- Assemble the frame: Connect the matching frame sections and secure the feet as instructed.
- Install the graphic: Check the artwork direction and fit the fabric evenly without forcing it.
-
Position the stand: Use a level surface, check stability, smooth the graphic, and keep walkways clear.

Some compact sizes may be manageable by one person after practice. A larger frame or graphic may be easier with a helper. Setup depends on the model, size, experience, venue conditions, and accessories, so do not plan around one universal installation time.
Display: Make the Message Easy to Notice
A portable display should help visitors understand who you are and what to do next. Use a visible logo, one short headline, one strong image, and one action such as scanning a QR code, visiting the table, or asking a question. Avoid turning the graphic into a full brochure.
Placement matters as much as the artwork. A stand beside a table can introduce the brand before visitors reach the products. Near an entrance, it can guide people toward check-in or a demonstration. In an open area, a double-sided graphic may help when traffic approaches from two directions. Always confirm the full footprint, including the feet or base.
Two Portable Fabric Options from POB
EZ Banner Stand
The EZ Banner Stand uses a lightweight aluminum tube frame, a fitted stretch-fabric graphic, and a carry bag. It offers single- and double-sided choices and works well beside a vendor table, counter, product rack, reception point, or compact booth.
Choose this style when flexible placement and a narrow footprint matter most. It can carry a logo, product category, QR code, schedule, or supporting message without taking over the whole booth.
Portable Tension Fabric Banner Stand
The Portable Tension Fabric Banner Stand uses connected aluminum frame sections with a full-color stretch-fabric graphic. Its taller visual area can create a stronger standalone presence for trade shows, brand activations, corporate presentations, campus events, interviews, or photo areas.
Choose this option when height and graphic area matter more than having the smallest possible system. Confirm the finished width and height, venue rules, printing side, and available floor space before ordering.
If you need a wider branded backdrop, explore the Tension Fabric Display Collection. These larger systems serve a different purpose and may require more transport and setup space.
EZ Banner Stand vs. Portable Tension Fabric Banner Stand
| Comparison | EZ Banner Stand | Portable Tension Fabric Banner Stand |
|---|---|---|
| Best for | Vendor tables, compact booths, signage, and supporting messages | Trade shows, brand events, creator spaces, and taller visual statements |
| Placement | Beside a table, counter, entrance, or product area | As a standalone feature or part of a coordinated event display |
| Visual priority | Compact and flexible brand communication | More height and a larger fitted graphic surface |
| Printing choices | Single- or double-sided | Single- or double-sided |
 Indoor and Outdoor Use Are Different
Portable fabric stands are most predictable on level floors in controlled indoor spaces. Keep them inside the assigned booth, away from emergency routes, and within venue height limits.
Outdoor use adds wind, moisture, uneven ground, and changing weather. Do not assume that an indoor banner stand is weather-rated. Confirm the stated application and anchoring rules, and stop using the display if conditions become unsafe. If outdoor events are a regular part of your schedule, choose a display designed specifically for outdoor conditions.
Care for the Graphic Between Events
After each event, inspect the frame sections, feet, connectors, and fasteners. Remove light dust with a clean, soft cloth, make sure the graphic is dry, and keep printed fabric away from dirty floors and sharp hardware. Store the complete bag in a clean, dry area away from heat and direct sunlight.
When the campaign changes, a compatible replacement graphic may allow you to reuse the frame. Keep the original product name, size, printing option, and order information because similar-looking systems are not always interchangeable.
Portable Banner Stand Checklist
- Confirm the indoor or outdoor venue and the available width, depth, and height.
- Compare finished size, packed dimensions, complete weight, and case count.
- Decide who will transport, assemble, dismantle, and repack the display.
- Choose single-sided printing for one main viewing direction or double-sided for two-way traffic.
- Confirm exactly which frame, graphic, feet, connectors, and bag are supplied.
- Check artwork templates and replacement-graphic compatibility before ordering.
Once you know your available space, viewing direction, and transport limits, browse the Banner Stand Collection to compare suitable sizes and structures.
Frequently Asked Questions
Does portable mean the stand is approved as airline luggage?
No. Portable describes how the display packs and moves, not an airline approval. Measure and weigh the complete packed system, then confirm current rules with the airline.
What artwork files should I prepare?
Use the template for the exact product and size. High-resolution PDF or AI files are commonly preferred. Clearly label front and back files for a double-sided order.
What if my vendor spaces change from one event to another?
Choose a stand that fits your smallest common space and can work beside different tables or counters. Always review the full footprint and venue height limit before each event.
Can I replace the graphic and reuse the frame?
Often, but the new graphic must match the exact frame model, size, shape, attachment method, and printing format. Confirm compatibility before ordering a graphic-only replacement.
Build a Display That Can Keep Up
The best portable banner stand for a traveling vendor or creator works through the full event cycle: compact packing, suitable travel protection, manageable setup, and a clear finished message. Start with the venue, transport plan, display area, and team instead of choosing by appearance alone.
Still unsure which size or structure fits your schedule? Contact POB Backdrops with your event type, available space, preferred viewing direction, and need-by date.